Renter-Friendly Ways to Hide Cables on Walls
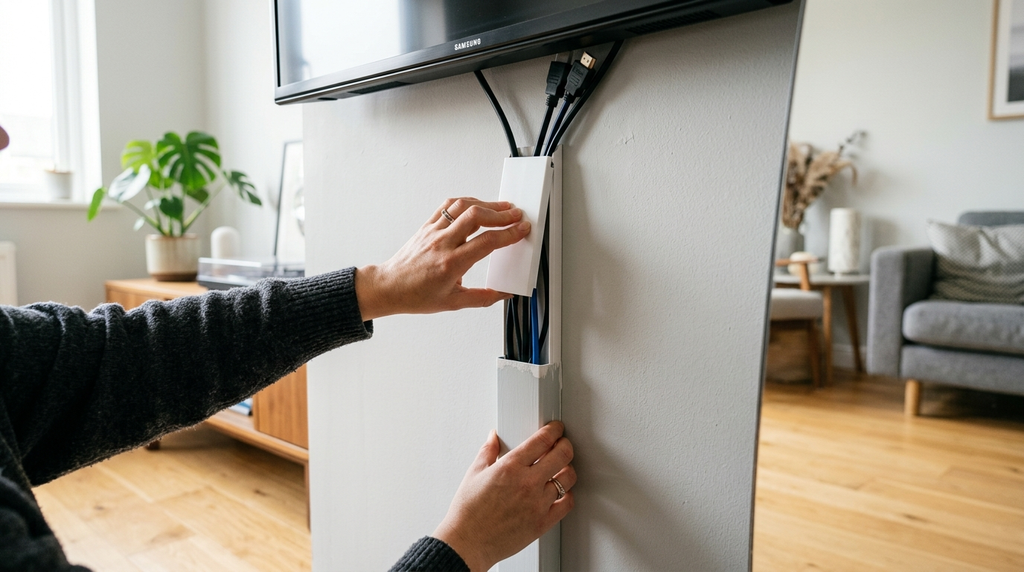
A paintable adhesive cable raceway is the best renter-friendly way to hide cables on a wall: a slim plastic channel sticks to the wall, snaps closed over the wires, and can be painted your wall color so it nearly disappears. Pair it with a cable box at floor level and the room reads wire-free — no drilling, no deposit deductions. The full toolkit covers seven methods, from $5 fabric sleeves to painted raceways that vanish in photos, plus room-by-room playbooks for the three worst offenders: the wall-mounted TV, the mid-room desk, and the bedside cluster.
One safety rule before any of it: a TV’s power cord must never be fished inside a wall — that requires code-rated wiring (explained in full below), and it is the one mistake in this project that is genuinely dangerous rather than merely ugly.
At a Glance
| Method | Hides Completely | Damage-Free | Best For | Cost |
|---|---|---|---|---|
| Paintable raceway | Yes | Yes | Wall-mounted TV, desk runs | $$ |
| Fabric sleeve + wall hooks | Mostly | Yes | Bundling many thin cables | $ |
| Baseboard tucking | Partially | Yes | Along-wall runs | $ |
| Behind-furniture routing | Mostly | Yes | Desks, consoles | $ |
| Cable box / drawer | Yes (floor) | Yes | Power strips and adapters | $ |
| Removable-hook “spine” | Partially | Yes | Nightstands, gaming rigs | $ |
| Corner/trim raceway route | Yes | Yes | Door frames, wall corners | $$ |
How We Chose These Methods
- Damage-free performance. Every method must remove cleanly from painted drywall and plaster — no anchors, no staples, no residue.
- Completeness of the fix. How invisible is the result from the sofa and in photos?
- Cost. Every solution is under $60; most are under $25.
- Skill required. All are beginner-level, tool-light projects doable in an afternoon.
- Safety margin. Methods must not create trip hazards, pinched cords, or code violations.
Why Cables Take Over (and Why They’re Worse Than They Look)
Three forces conspire against a tidy rental. First, device count: a modern TV wall accumulates a TV power cord, a streaming box, a soundbar, a games console, and a network cable — five lines where one used to run. Second, outlet placement: builders place outlets where code requires them, not where furniture and screens actually land, so at least one cable must travel. Third, gravity and attention: cables sag into view exactly at seated eye level, which is where the eye rests. The methods below win by converting scattered sagging lines into one deliberate vertical run — and then hiding that run against the architecture.
The other half of the problem is the floor. Even a perfectly hidden wall run ends in a power strip with a Medusa of adapters, and that’s where the cable box takes over.
#1. Paintable Cable Raceway (Best Overall)
An adhesive-backed plastic channel, usually 1 in wide, that holds 3–4 cables and snaps closed. Corners and elbows make turns tidy.
Why It Works
It converts a dangling bundle into a hard, straight line attached to the wall — and once painted the wall color, the channel blends into the wall plane. From normal viewing distance it reads as a shadow line, and in photographs it disappears entirely. It is the only method that hides cables completely along an open wall, which is why it anchors every renter’s toolkit.
How to Do It
- Plan the route with painter’s tape first; straight verticals and inside corners hide the profile best. Corners where two walls meet absorb the channel’s depth almost perfectly — route there whenever the geometry allows.
- Unplug and label everything (tape flags on each cable, both ends — “TV power,” “HDMI 1,” “soundbar”).
- Bundle the cables flat — overfilled channels pop open, so if the cover won’t seat, remove a cable rather than force it.
- Wipe the wall with isopropyl alcohol at every adhesive point; dust is why strips fail. Press the base on firmly for 30 seconds per strip.
- Lay cables in, snap the cover shut, add elbow pieces at turns.
- Paint the cover with the wall color (two thin coats) using a sample pot matched to your paint.
Strengths
- The only method that hides cables completely along open walls
- Paintable to a near-invisible finish
- Removes cleanly at move-out
Trade-Offs
- Adhesive can pull paint from walls painted in the last 30 days — let new paint cure first
- Visible (though neat) if you skip painting
- Fixed route: rewiring means reopening the channel
Best For
Wall-mounted TVs above a media unit and desk runs down to floor outlets — the two most common rental cable crimes.
#2. Fabric Sleeve + Removable Hooks
A zip-up fabric sleeve bundles cables into one neat “spine,” held vertical by 3–4 removable adhesive hooks.
Why It Works
Cables look messy because they diverge. A sleeve makes them one object, and hooks run that object straight down the furniture’s shadow line — the least visible path. It’s also the cheapest complete fix, and it travels well: the same sleeve redeploys at the next apartment around whatever furniture lands there.
How to Do It
- Measure the run and cut the sleeve slightly long.
- Zip the cables inside, leaving connector ends exposed by 2–3 in.
- Stick removable hooks down the leg/wall shadow line at even intervals and rest the sleeve on them.
Strengths
- Cheapest complete fix (under $15)
- Perfect for desks mid-room and gaming setups
- Reusable and repositionable
Trade-Offs
- Still visible — “tidied,” not hidden
- Fabric sleeves sag if overloaded
Best For
Desk setups, TV stands against the wall, and situations where the raceway route has no clean wall run.
#3. Cable Box at Floor Level
A lidded box that swallows the power strip and adapters, with notched sides for cables to exit.
Why It Works
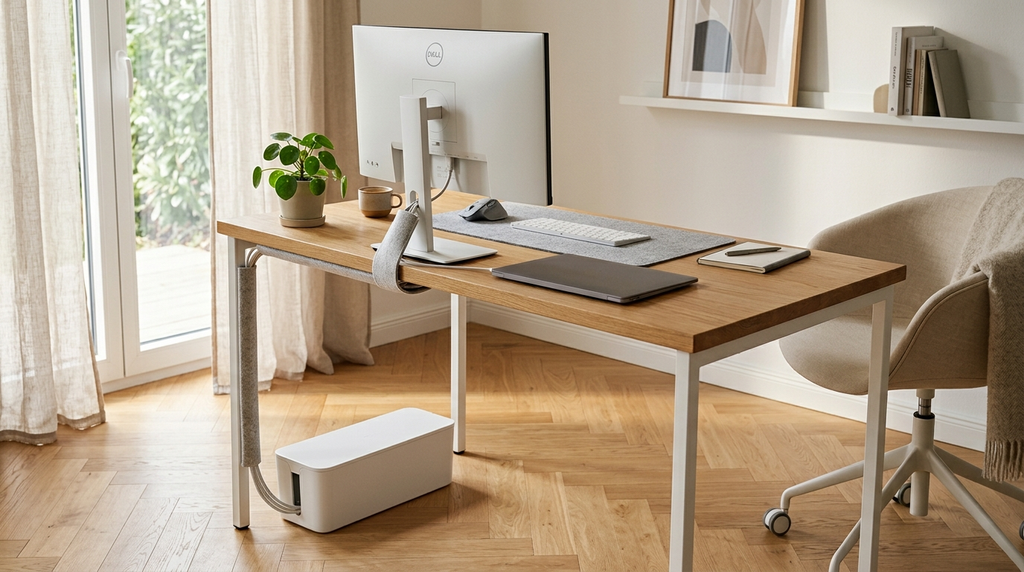
Even a perfectly racewayed TV run ends in a tangle of power bricks. The box hides that ending, keeps dust out, and stops accidental plug kicks. It also consolidates the reset-and-unplug point: when the router needs its ritual reboot, everything is in one place instead of scattered behind furniture.
How to Do It
- Place the box where the bundle lands (under the console or behind it).
- Feed cables through the side notches, coiled inside.
- Keep the box ventilated — never cover it with cushions or clutter, and never run it under a rug.
Strengths
- Instant cleanup of the ugliest zone
- Works in every home, rented or owned
- Child-resistant improvement over exposed strips
Trade-Offs
- Not for carpet placement with heavy loads; boxes sit best on hard floors
- Bulkier adapters may need a larger box
Best For
Every setup — this is the companion purchase to any method above.
#4. Baseboard Tucking and Behind-Furniture Routing (The Free Methods)
Two zero-purchase techniques that solve low-stakes runs: tucking cables into the gap where baseboard meets carpet, and routing everything down the shadow side of furniture legs.
Why It Works
The eye reads walls and furniture as solid blocks; cables traveling precisely along those boundaries register as part of the architecture rather than as clutter. Many homes (especially carpeted ones with tall baseboards) have a natural channel at the baseboard line that swallows one or two slim cables entirely.
How to Do It
- For baseboard runs: press the cable into the carpet gap along the trim with a blunt plastic tool; keep crossings (doorways) overhead via door trim, or switch to a raceway there.
- For furniture runs: bundle with the fabric sleeve and follow the leg with the most shadow, exiting behind the piece.
- Combine with a cable box at the end of the run.
Strengths
- Free and instant
- No adhesive contact at all
Trade-Offs
- Handles only 1–3 slim cables
- Carpet-gap channel quality varies wildly by home
Best For
Low-visibility runs along walls — lamp cords, a single network cable, speaker wire.
Tools & Materials You’ll Need
Essential
- Cable raceway kit (with corners/elbows) or fabric sleeve + removable hooks
- Cable box
- Painter’s tape, zip ties, isopropyl alcohol wipes
Optional
- Wall-color sample pot for painting raceways
- Velcro wall strips for lightweight routers
- Cord identifiers/clips
- Headlamp for working behind furniture
Room-by-Room Playbooks
The Wall-Mounted TV (The Main Event)
- Map the vertical route from TV to media unit with painter’s tape; use the inside corner if the TV is near one.
- Install the raceway base, load the low-voltage bundle (HDMI, network) — power cords travel outside the wall or via a code-rated kit (see safety section).
- Paint the cover; box the strip at floor level.
- Time: about 90 minutes including paint touch-up drying.
The Mid-Room Desk
- Sleeve everything down ONE table leg — the one nearest the outlet.
- Under the desk, run the sleeve along the frame to a cable box, or mount a small basket under the desktop as a hidden shelf for the strip.
- Velcro the excess coiled cable to the basket.
- Time: 30 minutes.
The Gaming Setup
Gaming adds controller chargers, headsets, and consoles to the standard desk problem. Add a pegboard or adhesive hooks on the desk’s back edge for hanging peripherals, and keep the console’s ventilation clear — never bury a console in a closed cabinet with the power brick.
The Bedside Cluster
Phone charger, lamp, e-reader cable: a single removable hook 18 in up the wall’s shadow line holds all three; a small cable clip at the headboard keeps the charging end reachable instead of fallen.
The Kitchen Counter
Small appliances on display (espresso machine, speaker): run cords along the backsplash’s shadow with adhesive clips, and plug into a counter-side outlet strip mounted inside a cabinet if the geometry allows.
The Fire-Safety Rules in Full
These rules apply to everyone, renter or owner, and they are the non-negotiable part of this article:
- Never run power cords under carpets or rugs. The National Fire Protection Association (NFPA) lists cords under carpeting as a fire hazard — trapped heat plus foot abrasion damages insulation over time.
- Never staple or nail cords to walls. Pierced insulation causes shorts; it also fails every deposit checklist.
- No daisy-chained power strips. The Electrical Safety Foundation International (ESFI) specifically warns against connecting strips and extension cords together; use one strip plugged directly into a wall outlet, sized for the load.
- Extension cords are temporary. ESFI’s position is that extension cords are for temporary use; a permanent power need means an outlet — talk to the landlord.
- Never run the TV’s power cord inside a wall. In the US, the National Electrical Code (NEC) requires in-wall-rated (CL2/CL3) wiring for anything fished inside a wall cavity. A standard power cord inside a wall fails inspection, voids insurance claims after an incident, and is a documented fire risk. Legitimate alternatives: an electrician installs an outlet behind the mount (many landlords approve — it adds value), or you use a code-rated “power bridge” kit designed for in-wall use.
- Match cord gauge to load. Thin extension cords running space heaters or amplifiers heat up; check the cord’s amp rating against the appliance label.
Common Mistakes to Avoid
- Sticking raceways onto fresh paint. Paint needs roughly 30 days to cure before adhesive contact; otherwise the strip takes paint with it at removal.
- Overstuffing channels. A cover that won’t snap shut is telling you something — split the bundle into two runs or upsize the raceway.
- Routing across doorways or walkways — trip hazard and instant visual failure, however tidy the rest is.
- Hiding heavy power bricks inside unventilated drawers or under cushions — heat needs somewhere to go.
- Labeling nothing. Six months later, “which cable is the soundbar?” becomes an archaeology project. Tape flags take two minutes.
- Forgetting the low-voltage distinction. HDMI, ethernet, and speaker wire are low-voltage and can legally be fished inside walls in many jurisdictions; power cords cannot. Knowing the difference prevents both over-caution and dangerous shortcuts.
- Removing adhesive at a right angle. Pull slowly, low heat from a hairdryer, angle parallel to the wall — straight-out yanks take paint every time.
Troubleshooting
- The raceway won’t stay stuck. The wall wasn’t cleaned, the paint is fresh, or the surface is textured. Clean with isopropyl alcohol, wait for cure, or switch to sleeves and hooks on heavy texture.
- The cover keeps popping open. Overfilled. Remove a cable or add a second channel.
- Adhesive residue at move-out. Warm with a hairdryer and roll off with a fingertip; residue removers (the citrus type) finish the job without dulling paint.
- The cable is too short for the clean route. Don’t stretch it taut across the room — replace it. HDMI and USB lengths are cheap; a trip hazard is not.
- The painted raceway shows brush texture. Use a small foam roller or spray the sample paint — brush marks catch light exactly the way you’re trying to avoid.
Budget Breakdown
| Tier | Spend | What it buys |
|---|---|---|
| Minimal | Under $20 | Fabric sleeve + hooks + zip ties |
| Standard | $40–60 | Raceway kit + cable box |
| Full setup | $80–120 | Two raceway runs + box + sleeve + clips + sample paint |
Pro Tips From Tidy Rentals
- Photograph the cable ends before unplugging. A phone photo of the back panel beats any label.
- Buy the raceway one size up. The 1-in profile fits 3–4 cables; the slim profile fits two and can’t grow with you.
- Run the vertical first, horizontal second. Verticals against walls hide best; horizontals (along baseboards) hide second; diagonals never.
- Keep one spare adhesive strip packet. Re-positioning after a week of settling is common; strips are the first consumable.
- Match the paint at move-in, not at move-out. Ask for the paint name/code on day one — future-you, painting a raceway or patching anything, will be grateful.
- Test the wall’s paint cure invisibly. Stick a removable hook somewhere hidden (behind the TV) for a week before committing the whole raceway.
Limitations and Trade-Offs
Adhesive methods have texture and age limits: heavy orange-peel drywall, fresh paint, and chalky old coatings all hold strips less reliably, and none of it changes where the outlets are. Raceways hide three to four typical cables — true home-theater walls (eight wires and growing) need two channels or a media-wall rethink with an electrician. And every damage-free method shares one ceiling: they organize and conceal, but they can’t create power where none exists. The honest permanent fix for a power-starved wall is an outlet, and that’s a landlord conversation, not a product.
Practical Checklist
□ Route planned with painter’s tape before anything sticks □ Wall cleaned with isopropyl alcohol at every adhesive point □ Cables labeled at both ends before bundling □ Raceway painted wall color (two thin coats) □ Power strip inside a ventilated cable box □ No cords under rugs, through doorways, or inside walls □ Verticals and inside corners used wherever possible □ Photo taken of the wall at move-in for deposit protection □ Removal kit noted: hairdryer + low angle + patience
Regional Notes
United States: The NEC governs in-wall wiring; CL2/CL3-rated power bridge kits exist for DIY TV installations. Deposit disputes vary by state — documentation at move-in is your best protection.
United Kingdom: Most tenancy agreements forbid drilling without consent, making adhesive raceways the standard approach. UK plug adapters are the bulkiest in the world — size cable boxes accordingly, and note that UK rentals often have fewer outlets per room, so planning runs around socket locations matters more.
Canada/older homes everywhere: Plaster-and-lathe walls crumble with aggressive adhesive removal — always low-heat, low-angle, parallel pulls. Textured stipple ceilings and walls (common in 1970s–80s Canadian builds) need sleeve-and-hook methods rather than flat raceways.
Australia: Brick-and-block construction is common, especially in older terraces — adhesive struggles on bare brick, so use masonry-rated removable tape, raceways along trim, or route via furniture.
Expert / Official Guidance
- ESFI (Electrical Safety Foundation International): safe use of extension cords and power strips; the temporary-use doctrine; anti-daisy-chaining guidance.
- NFPA (National Fire Protection Association): electrical fire causes including cords under carpets; publisher of the NEC.
- NEC (National Electrical Code): CL2/CL3 in-wall cable ratings — the reason TV power cords cannot legally be fished inside walls.
Frequently Asked Questions
Do adhesive raceways damage paint?
Applied to cured paint and removed with low heat at a low angle, they are deposit-safe. Walls painted within the last month are the risk window — test with a single removable hook somewhere hidden first.
How do I hide cables from a TV above a fireplace?
A paintable raceway down the fireplace’s side trim, or a mantel-level cable box if the TV sits low enough. Routing inside the chimney breast itself needs an electrician and, for stone surrounds, isn’t worth the risk.
What is the cheapest instant fix?
A fabric sleeve down a furniture leg plus a row of small removable hooks — under $15 total, installed in twenty minutes.
Can I hide cables in a wall if I own the place?
Low-voltage cables (HDMI, ethernet, speaker wire) can often be fished inside walls DIY — check local code. Power needs CL2/CL3-rated assemblies or an electrician-installed outlet. Renter or owner, the physics and the fire code are identical.
How many cables fit in one raceway?
A standard 1-in raceway holds 3–4 typical cables (one HDMI, one power, one slim network). Two HDMI cables plus two power bricks will need two channels or a larger profile.
Will the landlord’s inspection notice a raceway?
Only if it’s removed badly. Installed and removed correctly, the wall shows nothing — which is the entire point of the method.
Final Takeaway
Buy a paintable raceway kit and a cable box (roughly $40 together), spend an afternoon planning the route along verticals and inside corners, painting the channel, and boxing the strip, and your walls read clean at checkout and in photos. Label everything, respect the fire-safety rules — nothing under rugs, nothing stapled, nothing inside walls unless it’s code-rated — and leave the in-wall shortcuts to licensed electricians. The deposit survives, the room photographs beautifully, and the next tenant will never know what you hid.