21 Kitchen Lighting Ideas for Small and Dark Spaces
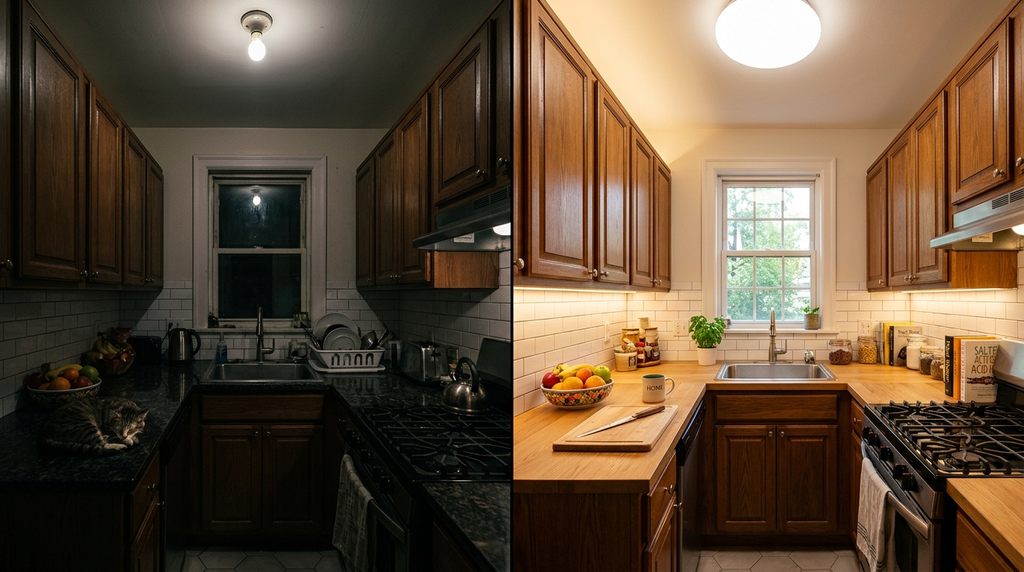
Dark kitchens need layered light, not a brighter bulb: under-cabinet LED strips are the single highest-impact fix because they light the counters where you actually work, supported by a warm central fixture on a dimmer and one accent layer. Target roughly 3,000–4,000 total lumens for a small kitchen, keep every bulb at a consistent 2700–3000K warm white, and add at least one dimmer. For renters, plug-in under-cabinet bars and rechargeable puck lights deliver most of the effect with zero wiring.
At a Glance
| Layer | Ideas | Brightness target | Renter-friendly? |
|---|---|---|---|
| Task (counters) | 1–7 | 450+ lm per 2-ft run | Plug-in versions yes |
| Ambient (ceiling) | 8–13 | 800–1,100 lm per fixture | Bulb swaps yes |
| Daylight/reflection | 14–17 | Free brightness | Yes |
| Accent/task extras | 18–21 | Varies | Mostly yes |
How We Chose These Ideas
- Impact-first ranking. Counter task light leads because that’s where dark kitchens actually fail — the ceiling can be perfect and your hands still shadow the chopping board.
- Consistency rule. All recommendations hold one color temperature, per American Lighting Association guidance on mixing.
- Renter path. Every layer has a no-wiring version.
Why Dark Kitchens Fail (The Shadow Problem)
The typical dark kitchen isn’t under-lit in total — it’s under-lit where work happens. A single ceiling fixture behind you casts your own shadow onto the counter exactly where your hands are. Cabinet soffolds block what little bounce existed; dark counters and backsplashes absorb instead of reflecting; and the fixture itself is often an under-lumen builder special running a bulb chosen by price. The result reads “dark kitchen” even when the meter says otherwise.
The layered fix addresses each failure in order: task light placed IN FRONT of your hands (ideas 1–7), ambient light that brightens the whole volume (8–13), and reflection that recycles both (14–17). The order matters — task first, because it’s the layer that touches food and knives, and because most people are surprised to learn their “dark kitchen” was really a shadowed-counter kitchen all along.
#1. Under-Cabinet LED Strips (The #1 Fix)
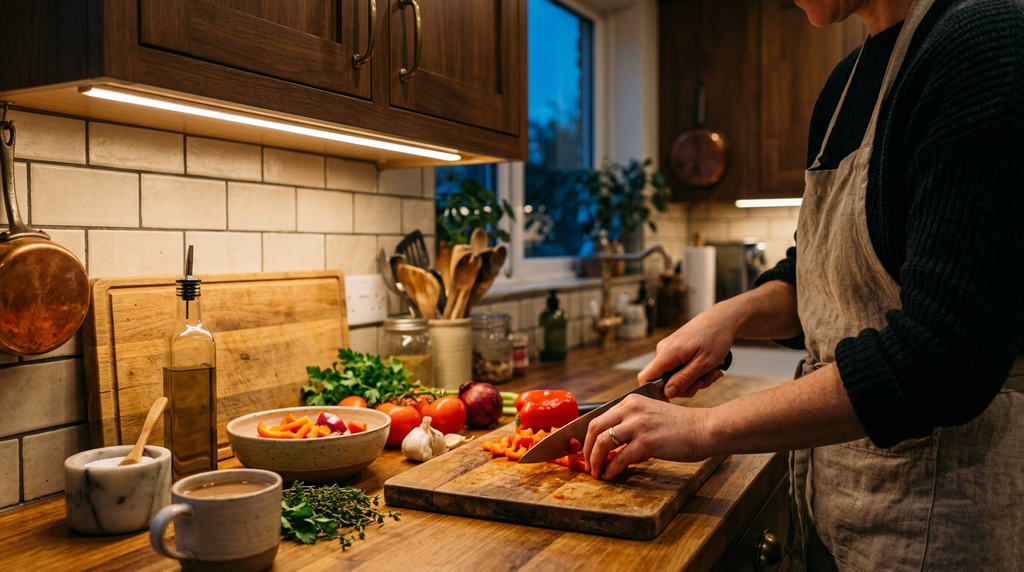
Hardwired or plug-in LED strips mounted under upper cabinets, washing the counter in even light.
Why It Works
Ceiling light behind you casts your own shadow onto the counter — the core problem of the dark kitchen. Under-cabinet strips place the source in front of your hands, eliminating task shadows entirely. It’s the fix that makes people say “why did I wait?” — and the one that most improves the room per dollar, because it converts existing lumens from misdirected to useful.
How to Do It
- Hardwired (renovation): electrician connects to a switched circuit.
- Plug-in (renters): bars or strips with one cord dropped to the nearest outlet — near-invisible when run along the cabinet underside.
- Choose 2700–3000K, warm white; 450+ lumens per two feet of counter.
Strengths
- Transforms the work zone in one afternoon
- Low energy, long life, no bulb heat near cabinets
- Doubles as a soft night-light on a dimmer
Trade-Offs
- Hardwired installs need an electrician
- Cheap strips buzz or flicker — buy reputable LED brands
Best For
Every kitchen with uppers over a counter — which is nearly every kitchen.
#2. Rechargeable Puck Lights (The Zero-Wiring Version)
Magnetic USB-charged pucks under cabinets — no outlet, no electrician.
Why It Works
Where even a plug-in cord can’t reach, pucks mount magnetically and charge weekly. Good ones deliver 40–80 lumens each — a trio under one cabinet run genuinely handles prep light. The category has improved enormously; the version to avoid is the push-click battery puck of the 2010s, which died weekly and cured everyone’s ambition.
How to Do It
- Mount the magnetic bases under the uppers, spacing pucks every 12–18 in.
- Charge via USB-C weekly (routine it — dead pucks at dinner is the known failure mode).
Strengths
- Truly zero installation
- Removable at move-out without a trace
Trade-Offs
- Charging discipline required
- Output tiers below hardwired strips
Best For
Renters and awkward corners no cord reaches.
#3. The Bulb Swap and Dimmer (The Free-ish Fix)
Replace the central bulb with a bright 800–1,100 lm LED at 2700K, and put the fixture on a dimmer if possible.
Why It Works
Many dark kitchens are simply under-lumened: a 60W-equivalent bulb in a dark room does half the job. Doubling delivered lumens and gaining a dimmer gives the kitchen the two levels it actually needs — full blaze for cooking, candle-low for evenings — from a fixture you already own.
How to Do It
- Check the fixture’s max rating; install the brightest compatible 2700K LED.
- Add a plug-in or switched dimmer per the fixture type (LED-compatible dimmer to avoid flicker).
Strengths
- Under $20 total
- Ten minutes of work
Trade-Offs
- Doesn’t fix task shadows (still need idea #1)
- Fixture style unchanged
Best For
Every kitchen, this weekend, before anything else.
The Full 21 Ideas
Task (counters first):
- Hardwired under-cabinet LED strips (above)
- Plug-in under-cabinet bars
- Rechargeable puck lights (above)
- Toe-kick LED strip — designed night-glow plus 3 a.m. navigation
- Over-sink spot — the most under-lit zone in the house; small pendant or recessed spot
- Inside-cabinet lighting on glass doors — sparkle layer showing off dishware
- Counter clamp lamp — the one-minute fix for a single dark corner
Ambient (ceiling): 8. Bulb swap + dimmer (above) 9. Replace the builder flush-mount with a diffused drum semi-flush — doubles perceived brightness 10. Track lighting re-aimed at counters, not floors 11. Two pendants instead of one over a peninsula — two sources break the single-shadow problem 12. Recessed downlights (renovation path) 13. Cove/above-cabinet uplight — LED tape bouncing soft light off the ceiling
Free brightness (windows and reflection): 14. Sheer window treatment instead of blinds — harvest every daylight photon 15. Mirror or glossy backsplash opposite the window — bounces daylight deep into the room 16. Light-counter discipline — clear surfaces, light boards and mats 17. Glass/reflective upper doors in truly dark kitchens
Extras: 18. Dimmer on everything — kitchens live at 100% and 20% 19. One color temperature everywhere — 2700–3000K; mixing reads jarring 20. Portable battery lantern for the table — task light exactly where you eat 21. Motion-sensor night light low on a wall — water runs without the full blaze
Lumens and Kelvin Cheat Sheet
| Zone | Target |
|---|---|
| Overall small kitchen | 3,000–4,000 lm total across layers |
| Under-cabinet task | 450+ lm per 2-ft run |
| Sink | 500–700 lm focused |
| Ambient ceiling | 800–1,100 lm per fixture |
| Color temperature | 2700–3000K everywhere |
The Layering Plan (Applying the Ideas to a Real Kitchen)
The Typical 10×10 Galley
Two under-cabinet runs (the walls’ worth), one upgraded ceiling fixture on a dimmer, and a sheer window treatment. Four purchases, one weekend, and the room reads professionally lit — galley geometry amplifies every source, so the small kitchen’s problem becomes its advantage.
The Kitchen-Diner
Split the plan: task layer in the kitchen zone, pendant/lantern layer over the dining table, both on dimmers — the two zones deserve different moods after 7 p.m. The mistake to avoid: one switch killing both zones together.
The Kitchen With No Window At All
Ideas 1, 8, and 15 carry the load; add a switchable-white bulb option for daytime task work if the room reads cave by day — warm for evenings, a 3500–4000K daytime setting for prep hours (see our windowless-bathroom guide for the same logic).
The Renter Priority Order
Plug-in under-cabinet kit → rechargeable pucks → bright 2700K bulb swap → sheers → battery stick lights in the pantry. Typically under $120 total, and all of it moves with you.
Room Examples: Two Kitchens, Transformed
The rental galley. A city rental with one dim ceiling dome and dark tile: the renter path ran exactly — plug-in bar kit under both cabinet runs ($40), a 1000-lm 2700K bulb ($8), and sheers replacing mini-blinds ($20). The before-and-after photographs look like different rooms; the total was under $70 and one hour of work.
The renovation that got lighting right. A couple redoing a kitchen allocated lighting first instead of last: six recessed cans on a dimmer, hardwired under-cabinet strips on a separate switch, two pendants over the island, and toe-kick night lighting. The lesson they report: the lighting layout drove the electrical plan, rather than the electrical plan accommodating leftover lighting — the difference between a kitchen that photographs and one that works at 7 a.m. in January.
Fixture Styles: What Reads Right (Ceiling Edition)
The central fixture swap (idea 9) deserves its buying logic, because the fixture sets the kitchen’s style register more than any other single element:
| Fixture style | Light quality | Reads | Best kitchen |
|---|---|---|---|
| Diffused drum semi-flush | Soft, broad | Transitional-modern | The safe upgrade for most |
| Schoolhouse globe | Soft, period | Vintage/traditional | Period homes |
| Lantern-style | Directed down | Farmhouse/transitional | Kitchens with height |
| Recessed (multiple) | Clean, even | Modern-minimal | Renovations |
| Track, re-aimed | Adjustable | Retro-industrial | Galley and loft kitchens |
The diffused drum earns its “default upgrade” status twice over: it scatters light sideways onto walls (which brightens the room’s perceived volume) as well as down, and its shade hides the bulb — glare being the dark kitchen’s rudest companion after the shadows.
The Renter’s Complete Shopping List
The full no-wiring plan, itemized:
- Plug-in under-cabinet bar kit (two bars + cord) — $25–45
- Rechargeable puck lights, set of 3–6 — $20–35
- Two 2700K LED bulbs, 800–1100 lm (ceiling + one lamp you move in) — $10
- Sheer curtains to replace blinds — $15–25
- Battery stick lights for the pantry interior — $10–15
- One dimmable floor or table lamp for the dining end — $25–50
Total: roughly $105–180 for a transformed kitchen, every item owned outright and moving to the next rental. The order to buy in: 1, 3, 4 first weekend; 2, 5 when the budget allows; 6 whenever a lamp goes on sale.
The Energy Note (What Running All This Costs)
The layered plan’s running cost is smaller than it looks, because LEDs changed the arithmetic: an under-cabinet strip run (say 8 W) plus an upgraded ceiling bulb (12–15 W) plus pucks draws under 30 W total — roughly one incandescent bulb’s draw for the entire layered scheme, at a usage profile of a few hours daily. The dimmer saves further (dimmed LEDs sip proportionally), and ENERGY STAR-certified fixtures benchmark the efficient end of the category. The practical guidance: buy reputable LED once, stop reading wattage as cost, and put the always-on layers (toe-kick, night-light) on timers or sensors so “always on” doesn’t mean “always paid for.”
Common Mistakes to Avoid
- One central fixture doing everything — the root cause of most dark kitchens; shadows fall exactly where you chop.
- Mixed color temperatures — a cool bulb beside a warm one reads institutional.
- Over-lumen, under-layer — one blinding 1600-lm bulb is worse than three 600s.
- Pendants hung wrong — 30–36 in above counter/island surface is the standard.
- No dimmer — kitchens need a candlelight register too.
- Ignoring the window — shears plus a reflective backsplash are free fixtures forever.
- Buying strips by price — the cheap reels flicker, buzz, and fail within a year; buy from lighting brands.
Troubleshooting
- Strips show hotspots on the counter. The LEDs are too sparse — choose “dense” or COB-style strips for continuous light rather than dotted beams.
- The plug-in cord shows. Run it inside the cabinet’s false bottom or along the cabinet’s underside edge with adhesive clips; the last resort is drilling a grommet hole (owner kitchens only).
- Pendants glare at seated eye level. They hang too low or the bulbs are bare — raise to spec, add frosted glass.
- The dimmer buzzes. Mismatched dimmer and LED; use dimmer-rated bulbs and a compatible dimmer, or accept full-on and add a plug-in lamp-style layer instead.
- The kitchen still feels dark at noon. That’s the reflection layer: light counters, glossy backsplash, sheers — the fixtures are done, the surfaces are next.
Limitations and Trade-Offs
Lighting can’t fix genuinely dark finishes — dark cabinets and slate counters absorb whatever you install; the reflection layer (ideas 14–17) matters more as finishes get darker. Hardwired ideas need electricians and, in the UK, awareness of Part P electrical rules for DIY work. Recessed lighting trades flexibility for permanence. And no bulb changes a north-facing room’s winter mood on its own — the layered plan is the honest answer, executed in the order this guide ranks it.
Practical Checklist
□ Task layer installed or ordered (idea #1 or its renter twin) □ Central bulb upgraded to 800–1,100 lm, 2700K □ All bulbs one color temperature □ At least one dimmer in the plan □ Sink and darkest corner addressed □ Window treatment checked (sheers over blinds) □ Reflection surface added or cleaned □ Renter: entire plan ≤ $120 and fully removable
Regional Notes
UK/northern Europe: daylight is scarce October–March — the task+ambient layering matters most; check Part P before hardwired DIY.
US: recessed cans + under-cabinet strips are the standard renovation package; ENERGY STAR fixtures cut the always-on energy cost.
Canada: dark winter afternoons make lighting season eight months long — prioritize the task layer and dimmers.
Australia: indoor-outdoor kitchen flow makes evening light transitions matter; warm 2700K carries the kitchen to the alfresco zone.
Expert / Official Guidance
- American Lighting Association: layering methodology and lumens-per-room guidance used in the cheat sheet.
- ENERGY STAR: certified LED fixtures and bulbs.
- UK Building Regulations Part P: which electrical DIY work requires qualified persons.
Frequently Asked Questions
How many lumens does a small dark kitchen need?
3,000–4,000 total across layers, with at least a third delivered onto the counters — not the ceiling.
Warm or cool bulbs for kitchens?
2700–3000K at home. 3500–4000K belongs to commercial kitchens and reads clinical at night. Switchable-white bulbs cover both if needed.
Are rechargeable pucks bright enough for real cooking?
For task zones, yes — quality pucks deliver 40–80 lm each and a trio covers one cabinet run. They’re the bridge solution, not the forever fix.
Do I need an electrician for plug-in under-cabinet lights?
No — that’s their entire point. Hardwiring enters the picture only for permanent, switch-controlled runs.
What’s the first purchase on a $50 budget?
The bulb swap plus one plug-in under-cabinet bar for the prep counter: about $30, covers the task-shadow problem where it actually hurts.
Can I layer smart bulbs into this?
Yes — smart bulbs handle the dimmer and color-temperature rules elegantly (one voice of control, consistent 2700K scenes). Just keep the layering logic: smart bulbs are the dimmer tier, not a substitute for placement.
Do I really need a dimmer, or is that a luxury?
In the kitchen, the dimmer is the evening. A room that runs full-blast at breakfast and candle-low at dinner is two kitchens for one fixture’s money — and the 20% setting is where the small dark kitchen stops feeling like a workspace at night.
What about lighting over the eating counter specifically?
One pendant or two short pendants at 30–36 in above the counter surface — bright enough to eat by (300–400 lm total), dimmable for later, and positioned to light the food, not the stools’ backs.
How do I know if my dark counters are eating my light?
The paper test: lay a white sheet of paper on the counter at night and look at the contrast between it and the surrounding surface. If the paper glows and the counter reads black, the reflection layer (light mats, glossy backsplash, cleared surfaces) will do as much for the room as another fixture would.
Is there a bulb that changes temperature through the day?
Yes — switchable-white LEDs shift from a cooler morning setting to 2700K evenings on a schedule or an app. They’re the single-bulb version of the two-bulb setup (idea 15), and genuinely useful in windowless kitchens that want to feel bright at noon and warm at dinner.
How long do under-cabinet strips actually last?
Quality LED strips are rated for tens of thousands of hours — years of daily kitchen duty — which is why the cheap-reel-versus-brand-strip decision is really a buy-it-twice-or-once decision. The adhesive is the usual failure point, not the LEDs: clean the mounting surface properly and the strip outlives the kitchen’s next repaint.
Final Takeaway
Put light on the counters first — strips or their plug-in twins — then upgrade the central bulb and add a dimmer, keep every bulb the same warmth, and squeeze the window with sheers and something reflective. Buy the fixtures from lighting brands rather than bargain reels, and run the renter’s list in order if no wiring is allowed. Four moves, one weekend, and the darkest kitchen becomes the most-used room it should be. Layer in the order this guide ranks, and the lumen budget follows the work, which is where lighting was always meant to live.